¶ Tuning guides
https://ellis3dp.com/Print-Tuning-Guide/
¶ Printing problem guides
https://www.simplify3d.com/support/print-quality-troubleshooting/
¶ BIBO 2 dual X
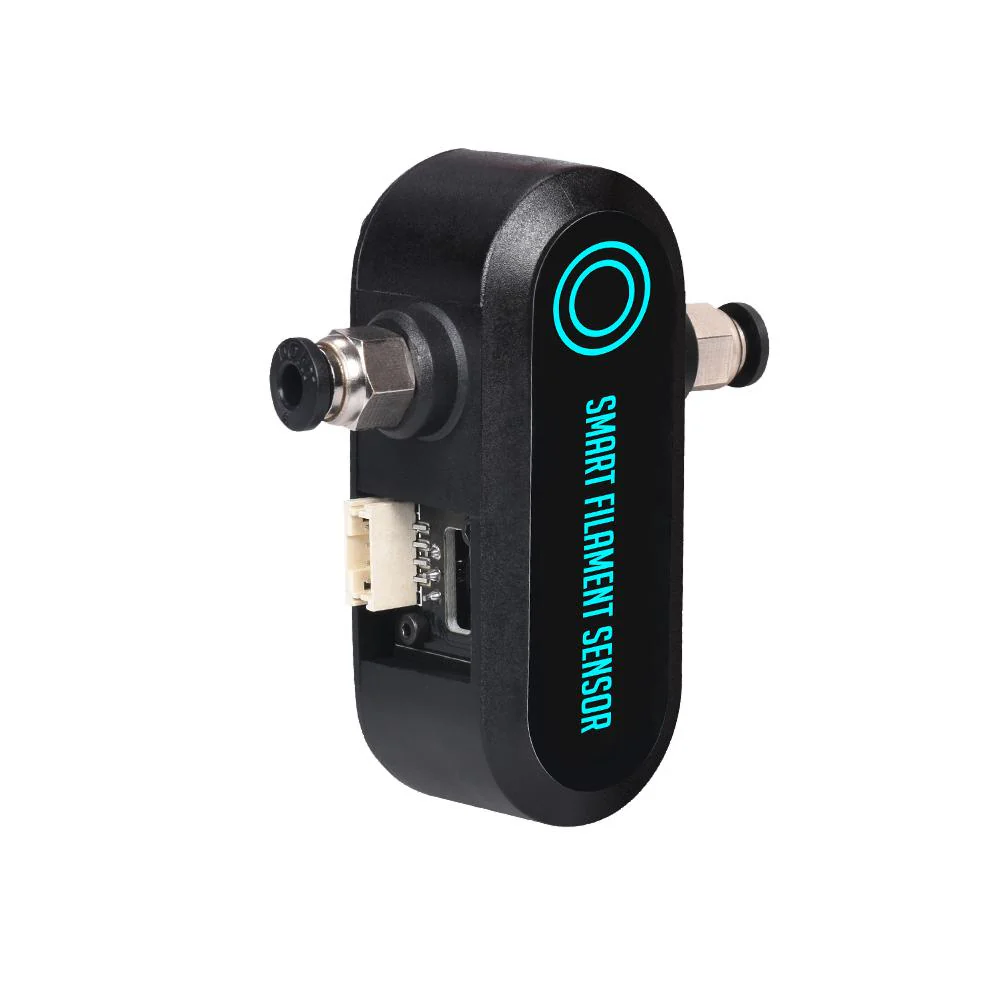
¶ Big Tree Tech smart filament sensor
¶ Marlin configuration
¶ configuration.h
#define FILAMENT_RUNOUT_SENSOR
#if ENABLED(FILAMENT_RUNOUT_SENSOR)
  #define FIL_RUNOUT_ENABLED_DEFAULT true // Enable the sensor on startup. Override with M412 followed by M500.
  #define NUM_RUNOUT_SENSORS   2          // Number of sensors, up to one per extruder. Define a FIL_RUNOUT#_PIN for each.
  #define FIL_RUNOUT_STATE     HIGH        // Pin state indicating that filament is NOT present.
  #define FIL_RUNOUT_PULLUP               // Use internal pullup for filament runout pins.
  //#define FIL_RUNOUT_PULLDOWN           // Use internal pulldown for filament runout pins.

  // Set one or more commands to execute on filament runout.
  // (After 'M412 H' Marlin will ask the host to handle the process.)
  #define FILAMENT_RUNOUT_SCRIPT "M600"

  // After a runout is detected, continue printing this length of filament
  // before executing the runout script. Useful for a sensor at the end of
  // a feed tube. Requires 4 bytes SRAM per sensor, plus 4 bytes overhead.
  #define FILAMENT_RUNOUT_DISTANCE_MM 7

  #ifdef FILAMENT_RUNOUT_DISTANCE_MM
    // Enable this option to use an encoder disc that toggles the runout pin
    // as the filament moves. (Be sure to set FILAMENT_RUNOUT_DISTANCE_MM
    // large enough to avoid false positives.)
    #define FILAMENT_MOTION_SENSOR
  #endif
#endif
¶ configuration_adv.h
#define M114_DETAIL
#define ADVANCED_PAUSE_FEATURE
#if ENABLED(ADVANCED_PAUSE_FEATURE)
  #define PAUSE_PARK_RETRACT_FEEDRATE         60  // (mm/s) Initial retract feedrate.
  #define PAUSE_PARK_RETRACT_LENGTH            2  // (mm) Initial retract.
                                                  // This short retract is done immediately, before parking the nozzle.
  #define FILAMENT_CHANGE_UNLOAD_FEEDRATE     10  // (mm/s) Unload filament feedrate. This can be pretty fast.
  #define FILAMENT_CHANGE_UNLOAD_ACCEL        25  // (mm/s^2) Lower acceleration may allow a faster feedrate.
  #define FILAMENT_CHANGE_UNLOAD_LENGTH      100  // (mm) The length of filament for a complete unload.
                                                  //   For Bowden, the full length of the tube and nozzle.
                                                  //   For direct drive, the full length of the nozzle.
                                                  //   Set to 0 for manual unloading.
  #define FILAMENT_CHANGE_SLOW_LOAD_FEEDRATE   6  // (mm/s) Slow move when starting load.
  #define FILAMENT_CHANGE_SLOW_LOAD_LENGTH     0  // (mm) Slow length, to allow time to insert material.
                                                  // 0 to disable start loading and skip to fast load only
  #define FILAMENT_CHANGE_FAST_LOAD_FEEDRATE   6  // (mm/s) Load filament feedrate. This can be pretty fast.
  #define FILAMENT_CHANGE_FAST_LOAD_ACCEL     25  // (mm/s^2) Lower acceleration may allow a faster feedrate.
  #define FILAMENT_CHANGE_FAST_LOAD_LENGTH     0  // (mm) Load length of filament, from extruder gear to nozzle.
                                                  //   For Bowden, the full length of the tube and nozzle.
                                                  //   For direct drive, the full length of the nozzle.
  //#define ADVANCED_PAUSE_CONTINUOUS_PURGE       // Purge continuously up to the purge length until interrupted.
  #define ADVANCED_PAUSE_PURGE_FEEDRATE        3  // (mm/s) Extrude feedrate (after loading). Should be slower than load feedrate.
  #define ADVANCED_PAUSE_PURGE_LENGTH         50  // (mm) Length to extrude after loading.
                                                  //   Set to 0 for manual extrusion.
                                                  //   Filament can be extruded repeatedly from the Filament Change menu
                                                  //   until extrusion is consistent, and to purge old filament.
  #define ADVANCED_PAUSE_RESUME_PRIME          0  // (mm) Extra distance to prime nozzle after returning from park.
  //#define ADVANCED_PAUSE_FANS_PAUSE             // Turn off print-cooling fans while the machine is paused.

                                                  // Filament Unload does a Retract, Delay, and Purge first:
  #define FILAMENT_UNLOAD_PURGE_RETRACT       13  // (mm) Unload initial retract length.
  #define FILAMENT_UNLOAD_PURGE_DELAY       5000  // (ms) Delay for the filament to cool after retract.
  #define FILAMENT_UNLOAD_PURGE_LENGTH         8  // (mm) An unretract is done, then this length is purged.
  #define FILAMENT_UNLOAD_PURGE_FEEDRATE      25  // (mm/s) feedrate to purge before unload

  #define PAUSE_PARK_NOZZLE_TIMEOUT           45  // (seconds) Time limit before the nozzle is turned off for safety.
  #define FILAMENT_CHANGE_ALERT_BEEPS         10  // Number of alert beeps to play when a response is needed.
  #define PAUSE_PARK_NO_STEPPER_TIMEOUT           // Enable for XYZ steppers to stay powered on during filament change.

  //#define PARK_HEAD_ON_PAUSE                    // Park the nozzle during pause and filament change.
  //#define HOME_BEFORE_FILAMENT_CHANGE           // If needed, home before parking for filament change

  #define FILAMENT_LOAD_UNLOAD_GCODES           // Add M701/M702 Load/Unload G-codes, plus Load/Unload in the LCD Prepare menu.
  //#define FILAMENT_UNLOAD_ALL_EXTRUDERS         // Allow M702 to unload all extruders above a minimum target temp (as set by M302)
#endif
¶ Marlin configuration to work with octoprint
¶ configuration_adv.h
#define EMERGENCY_PARSER
#define HOST_ACTION_COMMANDS
#if ENABLED(HOST_ACTION_COMMANDS)
  #define HOST_PROMPT_SUPPORT
  #define HOST_START_MENU_ITEM  // Add a menu item that tells the host to start
#endif
¶ Marlin Commands
¶ M205
M205 J0.08
0.4 x 10²(Jerk²) / 500(accélération) = 0.08 soit la valeur par défaut qui équivaut à un Jerk de 10
0.4 x 5²(Jerk²) / 500(accélération) = 0.02 donc 0.02 si je veux un Jerk de 5
¶ M218 (hotend offset - multi extruder)
¶ Display current settings
M218
¶ Set new offest
Offset E1 related to E0
M218 T1 X-40 Y-1.5
¶ M412 (runnout sensor configuration)
¶ Display current settings
M412
¶ Disable filament runout detection
M412 S0
¶ Enable (and reset) filament runout detection
M412 S1
¶ Set filament runout distance to 7mm (btt recommandation)
M412 D7
¶ Save configuration
M500
¶ Important links
¶ Filament length
https://www.filimprimante3d.fr/content/10-longueur-des-filaments
¶ Calibration
https://teachingtechyt.github.io/calibration.html
¶ Enable/disable cold extrusion prevention
For extruder testing
¶ Status
M302
¶ Disable
M302 P1
¶ Enable
M302 P0
¶ PID CALIBRATION
¶ If saved to EEPROM is enabled
- M503 print saved values
- M500 save values to eeprom
- M501 load values from eeprom
- M502 reset values in eeprom back to fireware configured ones
¶ PID AUTOTUNE
Enable pid autotune on first extruder in 8 cycles for a 230°
M303 E0 C8 S230
Enable pid autotune on second extruder in 8 cycles for a 230°
M303 E1 C8 S230
Enable pid autotune on bed in 8 cycles for a 80°
M303 E-1 C8 S80
¶ ENABLE PRINTED VALUES
M301 E0 P17.20 I1.06 D9.91
¶ SAVE PRINTED VALUES TO EEPROM
M500
¶ BL Touch Z-offset Leveling Instructions
Home your 3D printer
G28
Reset Z0-Offset
M851 Z0
Home your nozzle and show your Z-Axis
G28
Move the nozzle to true 0 offset
G1 F60 Z0
Switch off soft end stops
M211 S0
- Get a piece of letter/A4 paper and place it under your nozzle
- Lower your nozzle towards bed slowly until the paper can barely move
- Take note of the Z on the printer display (take that number and add the measurement of the calibration sheet or device used) or execute M114
M114 - Set your z offset. Mine measured -2.7 so I used -2.71.
M851 Z -2.71
Enable Soft Endstops
M211 S1
Save settings to Eeprom
M500
Display current settings
M851
Again, Tell the printer to go Home
G28
Move the nozzle to true zero offset to see your result
G1 F60 Z0
== Nozzle to probe offset
Display current value
M851
Set new value
M851 X-20.40 Y-36.91 Z-3.10
Save value
M500
¶ Octoprint
¶ Raspberry config
¶ Octoscreen
¶ Installer ecran lcd 3.5 pouces
¶ Dépendances
sudo apt install -y libgtk-3-0 xserver-xorg xinit x11-xserver-utils git build-essential xorg-dev xutils-dev x11proto-dri2-dev libltdl-dev libtool automake libdrm-dev
git clone https://github.com/ssvb/xf86-video-fbturbo.git
cd xf86-video-fbturbo
autoreconf -vi
./configure --prefix=/usr
make
(NOTE: at this point I got several warnings about "const", and "expected char * but type is const char *". I ignored the warnings and continued on)
sudo make install
sudo cp xorg.conf /etc/X11/xorg.conf
Install fbcp to "clone" the HDMI output
sudo apt-get -y install cmake
git clone https://github.com/tasanakorn/rpi-fbcp
cd rpi-fbcp
mkdir build
cd build
cmake ..
make
sudo install fbcp /usr/local/bin/fbcp
make fbcp start on every boot
sudo vi /etc/rc.local
Then, go at the end of file (but before the exit 0 ) and add a line where to find fbcp :
/usr/local/bin/fbcp &
Activate and setup HDMI:
sudo nano /boot/config.txt
Uncomment the following and change resolution
search '''hdmi_cvt''' and chande to :
hdmi_cvt 800 533 60 6 0 0 0
¶ Installing OctoScreen
wget https://github.com/Z-Bolt/OctoScreen/releases/download/v2.7.4/octoscreen_2.7.4_armhf.deb
sudo dpkg -i octoscreen_2.7.4_armhf.deb
(NOTE: This document is not kept up to date, and the build listed above might not be the latest release. To instll the lastest release, see https://github.com/Z-Bolt/OctoScreen/releases)
sudo vi /etc/octoscreen/config
search '''OCTOSCREEN_RESOLUTION''' and change to:
OCTOSCREEN_RESOLUTION=800x533
Reboot
sudo reboot now
Upon reboot, OctoScreen should run and should display correctly, without any screen resizing or any of the screen shifting issues that have been reported.
¶ Cura starting gcode
¶ Printer
; Script based on an original created by tjjfvi (https://github.com/tjjfvi)
; An up-to-date version of the tjjfvi's original script can be found
; here:  https://csi.t6.fyi/
; Note - This script will only work in Cura V4.2 and above!
; --- Global Settings
; layer_height = {layer_height}
; smooth_spiralized_contours = {smooth_spiralized_contours}
; magic_mesh_surface_mode = {magic_mesh_surface_mode}
; machine_extruder_count = 1
; --- Single Extruder Settings
; speed_z_hop = {speed_z_hop}
; retraction_amount = {retraction_amount}
; retraction_hop = {retraction_hop}
; retraction_hop_enabled = {retraction_hop_enabled}
; retraction_enable = {retraction_enable}
; retraction_speed = {retraction_speed}
; retraction_retract_speed = {retraction_retract_speed}
; retraction_prime_speed = {retraction_prime_speed}
; speed_travel = {speed_travel}

G21          ;metric values
G90          ;absolute positioning
M107         ;start with the fan off
M190 S{material_bed_temperature}; bed temperature
G28          ;homing
G29 A        ;Ensures UBL is activated for the next step
G29 L1       ;Load bed mesh
G0 F3600 Y0 X142 ;go outside of bed
¶ Extruder 1
G92 E0
G1 E20 F300; extrude
G0 F3600 Z0 ;go Z0
G0 F3600 Y0 Z0;wipe on bed border and start
G92 E0
¶ Extruder 2
G92 E1
G1 E20 F300; extrude
G0 F3600 Z0 ;go Z0
G0 F3600 Y0 Z0;wipe on bed border and start
G92 E1
¶ Camera
Use full potential of raspicam
sudo vi /boot/octopi.txt
camera="raspi"
camera_usb_options="-r 2592x1944 -f 15"
Raspicam sensor modes to match good resolution : https://picamera.readthedocs.io/en/latest/fov.html#sensor-modes
¶ Start/Stop webcamd
sudo service webcamd [start|stop|rastart|status]
¶ Take a photo with raspistil
raspistill -o photo.jpg
==Samba client
sudo apt update
sudo apt install -y samba samba-common-bin smbclient cifs-utils
sudo mkdir /mnt/nkshare
sudo vi /etc/fstab
//<IP>/share/ /mnt/nkshare cifs uid=1000,gid=1000,vers=1.0,rw,username=<username>,password=<password>,x-systemd.automount 0 0
sudo mount -a
sudo raspi-config
- System Options > Network at Boot > Yes
rmdir /home/pi/.octoprint/data/backup
ln -s /mnt/nkshare/Octoprint/backups/octoprint_server /home/pi/.octoprint/data/backup
¶ Plugins
- Bed Level Visualizer
- Backup scheduler
- PrintTimeGenius
- Octolapse
- HeaterTimeout
- OctoPrint-Enclosure
- HomeAssistant Discovery
- Preheat Button
- Octoslack
- Thermal Runaway
- Fullscreen Webcam
¶ Configurations
¶ Bed visualiser plugin (with ubl)
¶ Gcode for update mesh process
M190 S60            ; (optional) wait for the bed to get up to temperature
G28                 ; home all axes
G29 P1              ; automatically populate mesh with all reachable points
G29 P3              ; infer the rest of the mesh values
G29 F10             ;
@BEDLEVELVISUALIZER	; tell the plugin to watch for reported mesh
G29 S1 V            ; enabled leveling and report the new mesh
M500                ; save the new mesh to EEPROM
M140 S0             ; cool down bed
¶ Octolapse plugin
*Stabilization : back left
*Trigger : Smart - High quality
¶ Printer configuration
Home position:
*X:142
*Y:80
*Z:10
¶ Enclosure plugin
*output -> Regular IO -> Alimentation -> gpio : 5 -> active low -> show button on navbar
*output -> Regular IO -> LED-> gpio : 6 -> active low -> show button on navbar -> auto startup -> auto shutdown delay 5
*input -> Temperature senbsor -> Enclosure -> DS18B20 -> io : 26 -> serial : see next step
¶ DS18B20
Add this line to /boot/config.txt
dtoverlay=w1-gpio,gpiopin=26
And reboot then
sudo modprobe w1-gpio
sudo modprobe w1-therm
cd /sys/bus/w1/devices
ls
cd 28-xxxx (change this to match what serial number pops up)
cat w1_slave
Note the 28-xxxxx (28-03109779df35) it is the serial needed in the input temperature in enclosure plugin
¶ Filament Sensor Simplified
*Pin number : 37
*Switch type : triggered when closed
*Command to send : M600 X0 Y0
¶ Bibo profile
*Origin : center
*Width(X) : 214
*Depth (Y) : 186
*Height (Z) : 160
¶ Custom bounding box
*X Coordinates [Min : -122, Max : 107]
*Y Coordinates [Min : -93 , Max :93]
*Z Coordinates [Min : 0 , Max :160]
¶ PrusaSlicer
¶ Code for tower temps
;Temp tower layer height generator for Slic3r
;Add the following to before each layer change setting:
;M104 S{260 - (a * int(((layer_z - b)/ c)))}
;where a== temperature step per level
;b==the layer height for platform or brim
;c== the thickness in z of each temp tower level
;
;Examples ; https://www.thingiverse.com/thing:2493504/files
; at 0.2mm layer height, these have 6.8mm thickness per level and have a 0.8mm intro platform for better bed adhesion:
;PLA - 180-220: M104 S{220 - (5 * int(((layer_z - 0.8)/ 6.8)))}
;PETG/ABS - 220-260 M104 S{260 - (5 * int(((layer_z - 0.8)/ 6.8)))}
¶ Biqu H2 V2
Les fils du milieu sont a inverser sur le cable du moteur d'extrusion d'origine de la bibo sinon le moteur ne tourne pas et vibre
¶ Retractation
I've seen posts saying anywhere from 4 to 15 mm/s and 4 to 1 mm . The clicking isn't really noticable until you get over 10 mm/s.
¶ Current params used
- Retractation speed : 9 mm/s
- Retractation length : 0.2 mm
¶ Sensorless homing
Change *_STALL_SENSITIVITY for X axis to 130 (255 is super sensitive, 0 is not sensitive at all and will destroy everything)
M914 X70
¶ Bibo Current M503 output
Linear Units:
G21 ; (mm)
Temperature Units:
M149 C ; Units in Celsius
Filament settings (Disabled):
M200 S0
M200 T0 D1.75
M200 T1 D1.75
Steps per unit:
M92 X400.00 Y400.00 Z1600.00 E3728.00
Max feedrates (units/s):
M203 X500.00 Y500.00 Z12.00 E120.00
Max Acceleration (units/s2):
M201 X50000.00 Y50000.00 Z100.00 E1100.00
Acceleration (units/s2) (P<print-accel> R<retract-accel> T<travel-accel>):
M204 P500.00 R1100.00 T500.00
Advanced (B<min_segment_time_us> S<min_feedrate> T<min_travel_feedrate> J<junc_dev>):
M205 B20000.00 S0.00 T0.00 J0.08
Home offset:
M206 X0.00 Y0.00 Z0.00
Hotend offsets:
ho:  M218 T1 X-39.70 Y-0.70 Z0.000
Unified Bed Leveling:
M420 S1 Z10.00 ; Leveling ON

Unified Bed Leveling System v1.01 active
Active Mesh Slot 0
EEPROM can hold 31 meshes.

Material heatup parameters:
M145 S0 H180.00 B60.00 F0
M145 S1 H240.00 B80.00 F0
Hotend PID:
M301 E0 P19.65 I1.17 D82.34
M301 E1 P15.21 I0.95 D60.90
Z-Probe Offset:
M851 X-20.20 Y-36.91 Z-3.10 ; (mm)
Stepper driver current:
M906 X565 Y565 Z600
M906 T0 E565
M906 T1 E565

StallGuard threshold:
M914 X70
Driver stepping mode:
M569 S1 X Y Z
M569 S1 T0 E
M569 S1 T1 E
Tool-changing:
M217 Z2.00
¶ Klipper
¶ Mooncord
Discord Bot for Klipper
https://github.com/eliteSchwein/mooncord
https://wiki.tludwig.dev/mooncord/
¶ Klipperscreen
https://klipperscreen.readthedocs.io/
Klipperscreen is a web interface for RPI screens with touch control
You may have your screen installed and tested before kleeperscreen installation
¶ Installation
cd ~/
git clone https://github.com/KlipperScreen/KlipperScreen.git
./KlipperScreen/scripts/KlipperScreen-install.sh
This script will install the necessary packages, create a Python virtual environment at ~/.KlipperScreen-env, and install a systemd service file.
¶ Moonraker Configuration
- Ensure that the IP of the device is a trusted client in
moonraker.conf
[authorization]
trusted_clients:
  127.0.0.1
Alternatively, add the Moonraker API key to KlipperScreen.conf
- To use the update manager feature of Moonraker for KlipperScreen, add the following block to
moonraker.conf
[update_manager KlipperScreen]
type: git_repo
path: ~/KlipperScreen
origin: https://github.com/KlipperScreen/KlipperScreen.git
virtualenv: ~/.KlipperScreen-env
requirements: scripts/KlipperScreen-requirements.txt
system_dependencies: scripts/system-dependencies.json
managed_services: KlipperScreen
¶ Printer Configuration
Add the following basic configurations to your printer.cfg file for correct functionality
[virtual_sdcard]
path: ~/printer_data/gcodes
[display_status]
[pause_resume]
¶ CANBUS
¶ U2C
https://github.com/bigtreetech/U2C
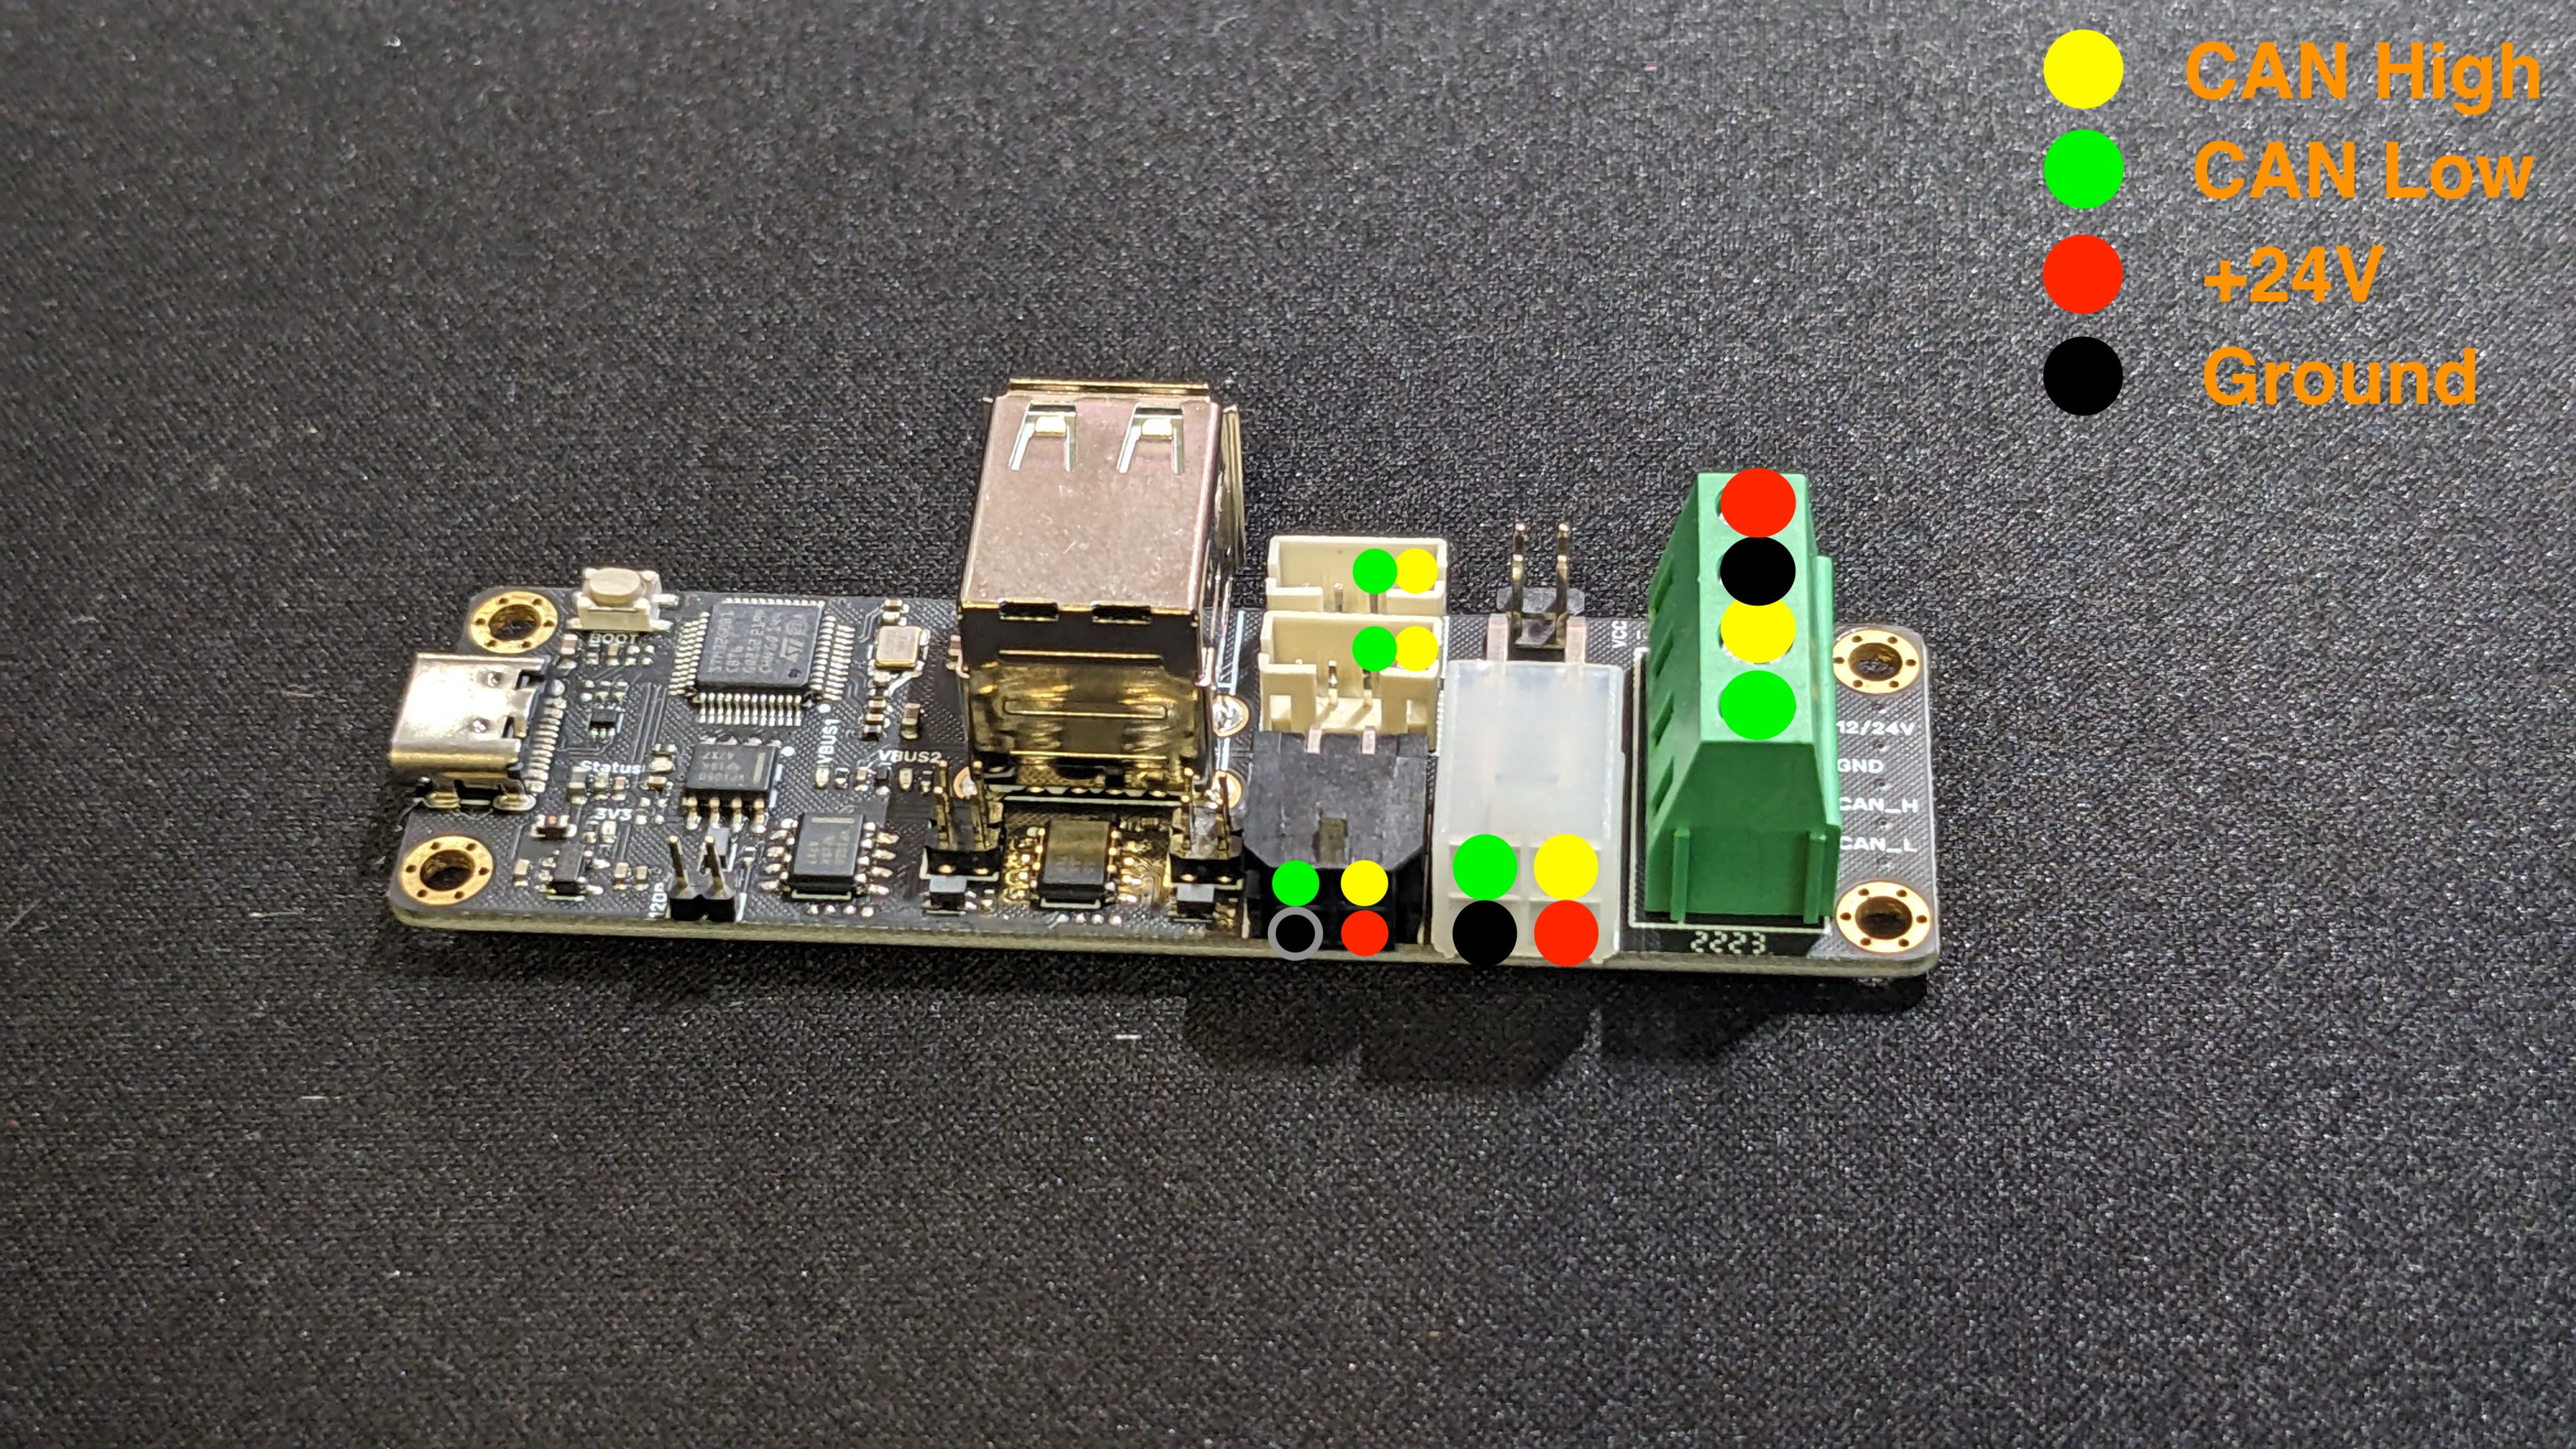
If your motherboard doesn't handle CANBUS it '''must''' be connected directly to RPI and not to U2C
¶ Flash patched U2C firware to make canbus flashing with katapult work for other devices
U2C does not need to be flashed with katapult or klipper to work as canbus bridge
¶ Boot U2C in DFU mode blue led ON
- Disconnect USB cable
- Press BOOT button while connecting usb cable to RPI
- Release BOOT button
¶ Flashing firmware
wget https://github.com/bigtreetech/U2C/raw/refs/heads/master/firmware/U2C_V2_STM32G0B1.bin
sudo dfu-util -D U2C_V2_STM32G0B1.bin -a 0 -s 0x08000000:leave
If '''File downloaded successfully''' you can safely ignore '''dfu-util: Error during download get_status'''
¶ CANBUS RPI interface
We must configure a network interface for canbus (RPI OS uses NetworkManager to manage network so /etc/network/interfaces is useless)
¶ Use systemd unit
sudo /bin/sh -c "cat > /etc/systemd/system/can0.service" << EOF
[Unit]
Description=Setup SocketCAN interface can0 with a baudrate of 1000000
After=multi-user.target

[Service]
Type=oneshot
RemainAfterExit=yes

ExecStart=/usr/sbin/ip link set can0 txqueuelen 1024 up type can bitrate 1000000
ExecStop=/usr/sbin/ip link set down can0

[Install]
WantedBy=multi-user.target
EOF

sudo systemctl enable --now can0
¶ Service commands
- Start
sudo systemctl start can0
- Stop
sudo systemctl stop can0
- Status
sudo systemctl status can0
¶ Check if canbus interface is UP
ip -details link show can0
Interface must be listed as UP
¶ Klipper firmware flashing
¶ Flash skr 1.4 turbo to enable USB flash bootloader (Katapult)
It has to be done only once
¶ Build Katapult
- Execute following commands on your SBC
git clone https://github.com/Arksine/katapult
cd katapult
make menuconfig
- Choose following build options. Mind the Processor Model: lpc1768 for SKR 1.3 / 1.4, '''lpc1769''' for SKR 1.4 Turbo
- press '''q''' to quit and '''Y''' when prompted to save
- Execute
make clean
make
- Get the resulting bin file out/katapult.bin and copy it to a Windows machine
¶ Flashing procedure for SKR 1.4 turbo
Reference : https://klipper.discourse.group/t/canboot-flash-btt-skr-1-3-1-4-1-4-turbo/3238
- Download Flashmagic (bootloader flasher) https://www.flashmagictool.com/download.html
- Power the board via USB or 12V / 24V
- Connect the USB TTL adapter to a Windows PC (potentially you need to install the FTDI VCP Drivers)
- Contact the USB TTL adapter as shown in the picture (cyan arrows)
** RX of the adapter to TX on the board
** TX of the adapter to RX on the board
** GND to GND
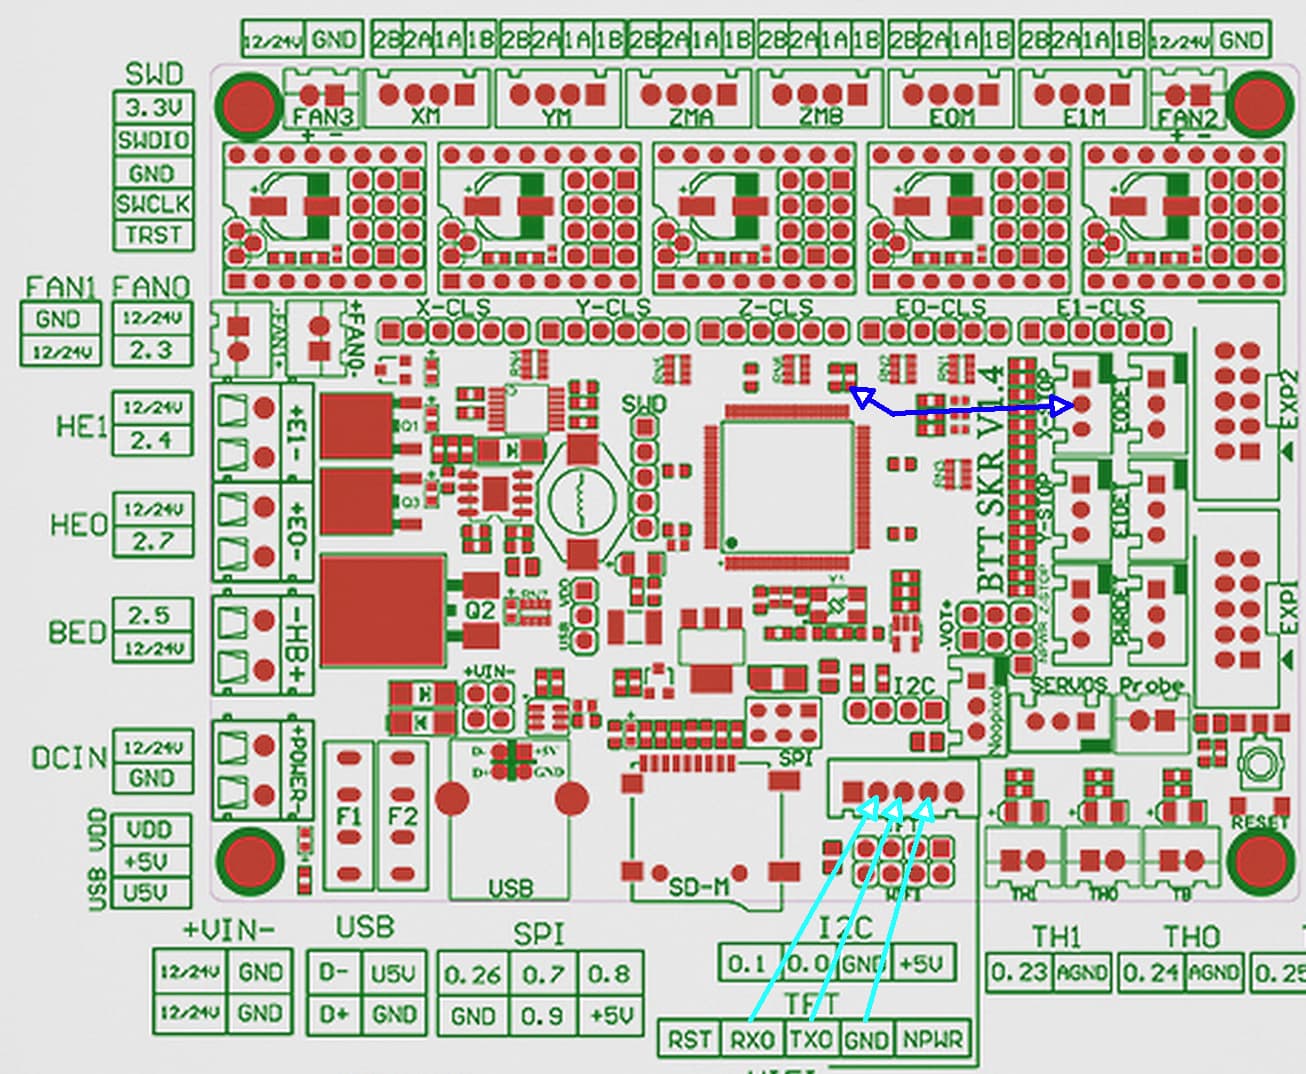
- Contact the SMD resistor (R28) to GND of the board (dark blue arrows), e.g. to the middle pin of an endstop (here the female to male jumper cable comes in handy). This will contact the ISP mode pin P2.10
- Reset the board while holding the contact (Nr. 4)
- Shortly after releasing the Reset button also remove the ISP connection (Nr. 4)
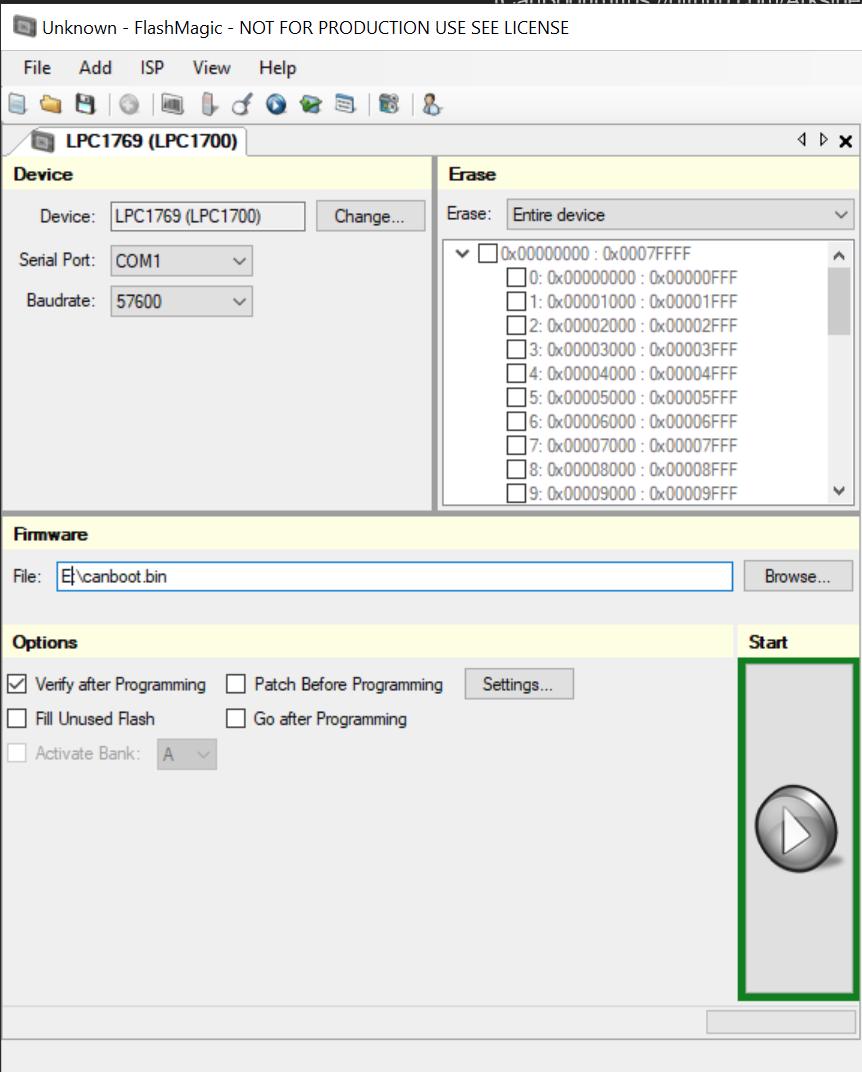
- Start Flashmagic
** Chose the katapult.bin file
** Set the correct COM port for your USB to TTL adapter (look it up in the windows device manager)
** Set the correct chip type
** Set Erase to Entire device
** Press start
- Wait until finished, then reset the board
¶ Flash Katapult bootload to EBB (enables flashing by CANBUS)
It has to be done only once
¶ Build Katapult
- Execute following commands on your SBC
git clone https://github.com/Arksine/katapult
cd katapult
make menuconfig
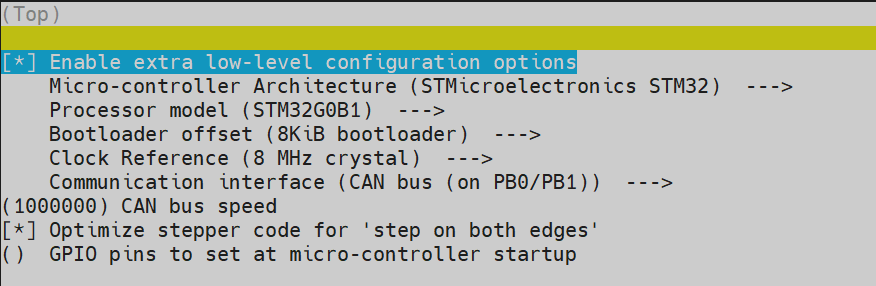
- Choose following build options. Mind the Processor Model: STM32G0B1 for EBB 36 / 42 v1.1/v1.2
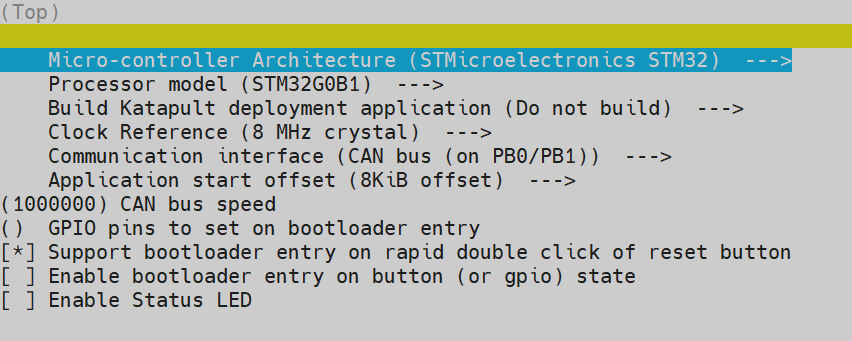
- press '''q''' to quit and '''Y''' when prompted to save
- Execute
make clean
make
¶ Flash katapult
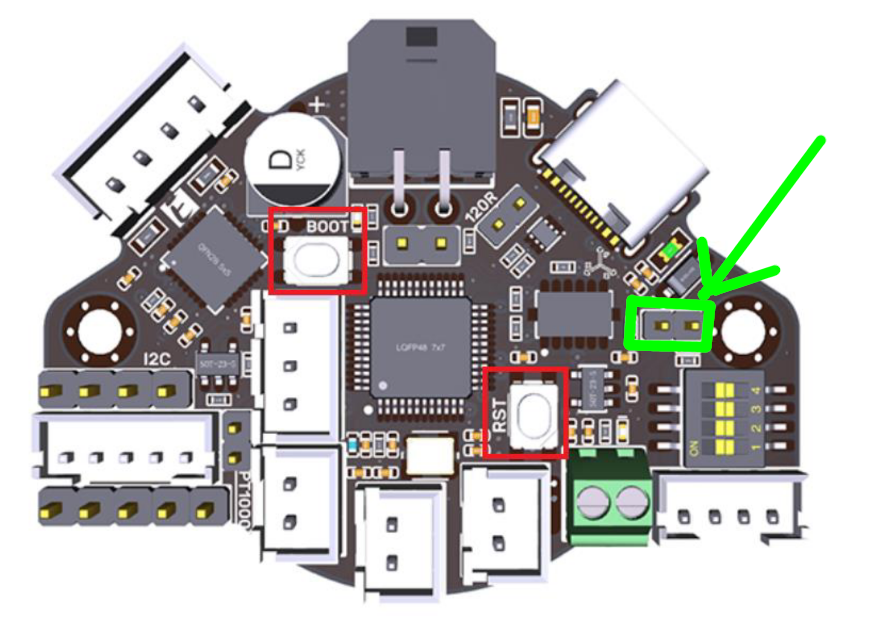
- Add the 5v jumper to the pins highlighted below
- Connect your device to your RPI via USB
- Hold the RESET button and BOOT shown above
** Release Reset
** Release Boot - Verify the device is in bootloader mode by using '''lsusb'''
** You should see something like
Bus 001 Device 005: ID 0483:df11 STMicroelectronics STM Device in DFU Mode - Flash the canboot bootloader to the board '''YOUR DeviceID (0483:df11) may be different CHECK IT!''' (see step 2)
- ERASE AND FLASH THE CANBOOT FIRMWARE
sudo dfu-util -a 0 -D out/katapult.bin --dfuse-address 0x08000000:force:mass-erase:leave -d 0483:df11
- If '''File downloaded successfully''' you can safely ignore '''dfu-util: Error during download get_status'''
- Remove the 5v jumper from step 1
¶ Build firmware for RPI
¶ If new installation of klipper
¶ init klipper mcu service
sudo cp ~/klipper/scripts/klipper-mcu.service /etc/systemd/system/
sudo systemctl enable --now klipper-mcu.service
¶ Make menuconfig
cd ~/klipper
make menuconfig
¶ Menuconfig options
¶ Micro-controller architecture
Linux process
¶ Build
sudo service klipper stop
make flash
sudo service klipper start
¶ Build firmware for skr 1.4 turbo
cd ~/klipper
make menuconfig
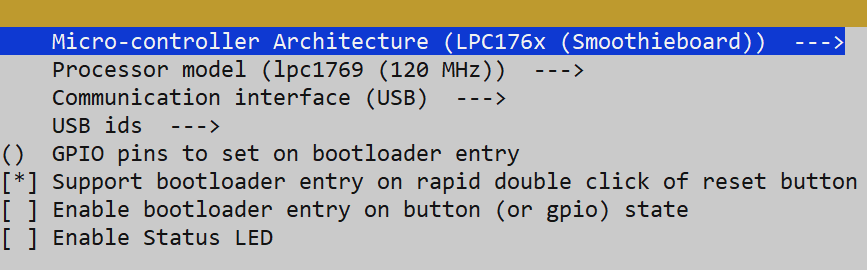
¶ Menuconfig options
¶ Micro-controller architecture
LPC176x
¶ Processor model
lpc1769 (120 Mhz)
¶ Target board uses Smoothieware bootloader
enabled
¶ Use USB for communication (instead of serial)
enabled
¶ Build
make clean
make
¶ Flash with USB (require katapult to be installed)
- Reboot bord in flashing mode '''Double click on reset button'''
- '''dmesg''' command to see on which device the card is
make flash FLASH_DEVICE=/dev/ttyACM0
¶ Flash with SD Card
- Copy '''/home/pi/klipper/out/klipper.bin''' to '''firmware.bin''' in a SdCard
- Plug the card into skr 1.4 SD Card slot
- Restart the printer
- Check the sd card, if the file is renamed '''firmware.cur''' the frimware is upgraded
¶ Build firmware for EBB
https://github.com/bigtreetech/EBB/tree/master
¶ Find CANBUS device UUID
~/klippy-env/bin/python ~/klipper/scripts/canbus_query.py can0
You should see something like
"Found canbus_uuid=XXXXXXXXXX, Application: CanBoot"
Assuming the above gave you a UUID you can now flash Klipper to your board via katapult
¶ Make menuconfig
cd ~/klipper
make menuconfig
¶ Menuconfig options
¶ Build
make clean
make
¶ Flash with CANBUS (require katapult to be installed)
MyUUID is the UUID found before
python3 ~/katapult/scripts/flash_can.py -i can0 -f ~/klipper/out/klipper.bin -u MYUUID
¶ Verification
To verify this you can query the canbus uuid with
~/klippy-env/bin/python ~/klipper/scripts/canbus_query.py can0
You should see something like
"Found canbus_uuid=XXXXXXXXXX, Application: Klipper"
¶ Input Shaper
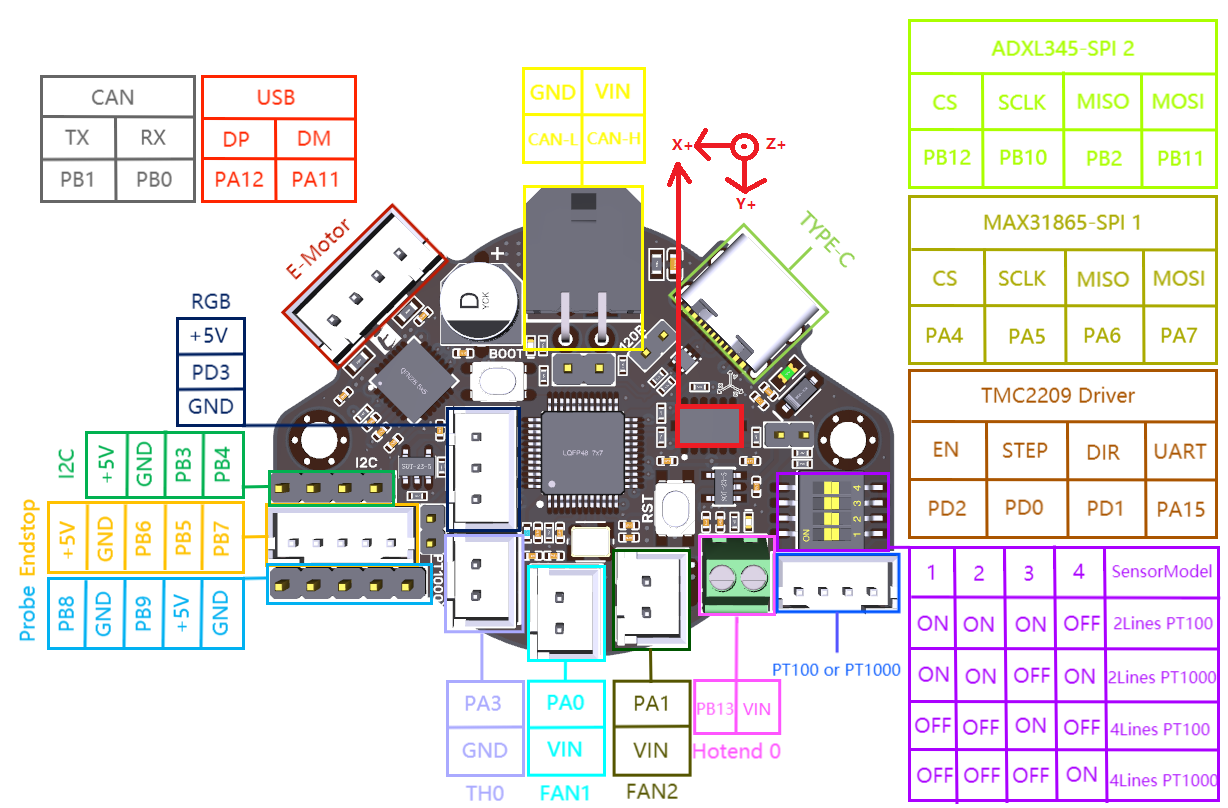
¶ Printer config for ebb36 v1.2
- Change axes_map accordingly to EBB positioning
axes_map: x,y,z - Change probe_points to 1 to many points (space needed around for gauntry movements)
[adxl345]
cs_pin: EBBCan: PB12
spi_software_sclk_pin: EBBCan: PB10
spi_software_mosi_pin: EBBCan: PB11
spi_software_miso_pin: EBBCan: PB2
axes_map: -z,-x,-y

[resonance_tester]
accel_chip: adxl345
probe_points: 151,137,40
Restart klipper firmware after modifications
¶ BTT smart filamentsensor V1
¶ Printer config for ebb36 v1.2
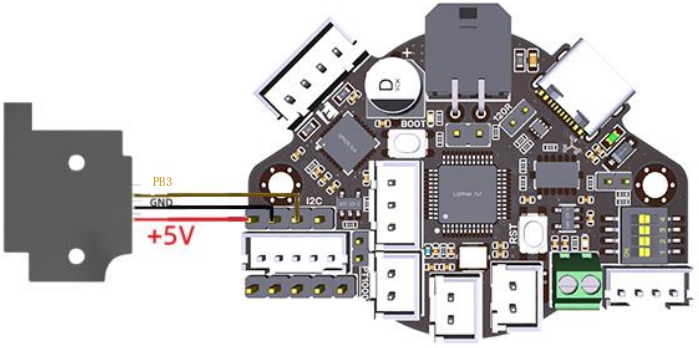
For BTT smart filament sensor v2 you have on more pin, that's not explained here
[filament_motion_sensor encoder_sensor]
detection_length: 7
#   The minimum length of filament pulled through the sensor to trigger
#   a state change on the switch_pin
#   Default is 7 mm.
extruder: extruder
switch_pin: ^EBBCan: PB3
pause_on_runout: False
runout_gcode:
  PAUSE # [pause_resume] is required in printer.cfg
  M117 Filament switch runout
insert_gcode:
  M117 Filament switch inserted
#event_delay:
#pause_delay:
¶ Macros for ease of use
[delayed_gcode DISABLEFILAMENTSENSOR] ; This will disable the SFS 1 second after klipper starts
initial_duration: 1
gcode:
    SET_FILAMENT_SENSOR SENSOR=encoder_sensor ENABLE=0 ; Put your filament sensor's name after SENSOR

[gcode_macro SFS_ENABLE] ; Add this to PRINT_START
description: Enable smart filament sensor
gcode:
    M117 ENABLING the Smart Filament Sensor
    G92 E0
    SET_FILAMENT_SENSOR SENSOR=encoder_sensor ENABLE=1 ; Put your filament sensor's name after SENSOR

[gcode_macro SFS_DISABLE] ; Add this to PRINT_END and PRINT_CANCEL
description: Disable smart filament sensor
gcode:
    M117 DISABLING the Smart Filament Sensor
    G92 E0
    SET_FILAMENT_SENSOR SENSOR=encoder_sensor ENABLE=0 ; Put your filament sensor's name after SENSOR
In this configuration filament sensor is disabled by default.
- Don't forget to enable it at print '''START''', '''RESUME'''
- Don't forget to disable it at print '''END''', '''CANCEL''', '''PAUSE'''
¶ Calibration process
¶ Check accelerometer is working
In klipper interface (where you input gcode)
ACCELEROMETER_QUERY
Must return something like that
Recv: // adxl345 values (x, y, z): 470.719200, 941.438400, 9728.196800
¶ Test X axis resonance
In klipper interface (where you input gcode)
'''!!!! Watch your printer vibrations can be really strong !!!!'''
TEST_RESONANCES AXIS=X
¶ Test Y axis resonance
In klipper interface (where you input gcode)
'''!!!! Watch your printer vibrations can be really strong !!!!'''
TEST_RESONANCES AXIS=Y
¶ Compute input shaper parameters
Previous steps will generate 2 CSV files (/tmp/resonances_x_.csv and /tmp/resonances_y_.csv). These files can be processed with the stand-alone script on a Raspberry Pi. This script is intended to be run with a single CSV file for each axis measured, although it can be used with multiple CSV files if you desire to average the results. Averaging results can be useful, for example, if resonance tests were done at multiple test points. Delete the extra CSV files if you do not desire to average them.
In klipper ssh command line
~/klipper/scripts/calibrate_shaper.py /tmp/resonances_x_*.csv -o /tmp/shaper_calibrate_x.png
~/klipper/scripts/calibrate_shaper.py /tmp/resonances_y_*.csv -o /tmp/shaper_calibrate_y.png
This will output somthing like that
Fitted shaper 'zv' frequency = 116.4 Hz (vibrations = 32.8%, smoothing ~= 0.017)
To avoid too much smoothing with 'zv', suggested max_accel <= 52800 mm/sec^2
Fitted shaper 'mzv' frequency = 73.4 Hz (vibrations = 12.2%, smoothing ~= 0.040)
To avoid too much smoothing with 'mzv', suggested max_accel <= 15900 mm/sec^2
Fitted shaper 'ei' frequency = 100.0 Hz (vibrations = 14.3%, smoothing ~= 0.034)
To avoid too much smoothing with 'ei', suggested max_accel <= 18600 mm/sec^2
Fitted shaper '2hump_ei' frequency = 88.4 Hz (vibrations = 5.7%, smoothing ~= 0.069)
To avoid too much smoothing with '2hump_ei', suggested max_accel <= 8700 mm/sec^2
Fitted shaper '3hump_ei' frequency = 82.2 Hz (vibrations = 0.5%, smoothing ~= 0.121)
To avoid too much smoothing with '3hump_ei', suggested max_accel <= 4900 mm/sec^2
Recommended shaper is 3hump_ei @ 82.2 Hz
Fitted shaper 'zv' frequency = 39.0 Hz (vibrations = 17.9%, smoothing ~= 0.105)
To avoid too much smoothing with 'zv', suggested max_accel <= 5900 mm/sec^2
Fitted shaper 'mzv' frequency = 32.4 Hz (vibrations = 3.0%, smoothing ~= 0.194)
To avoid too much smoothing with 'mzv', suggested max_accel <= 3100 mm/sec^2
Fitted shaper 'ei' frequency = 38.6 Hz (vibrations = 1.4%, smoothing ~= 0.216)
To avoid too much smoothing with 'ei', suggested max_accel <= 2800 mm/sec^2
Fitted shaper '2hump_ei' frequency = 42.8 Hz (vibrations = 0.0%, smoothing ~= 0.295)
To avoid too much smoothing with '2hump_ei', suggested max_accel <= 1900 mm/sec^2
Fitted shaper '3hump_ei' frequency = 52.4 Hz (vibrations = 0.0%, smoothing ~= 0.298)
To avoid too much smoothing with '3hump_ei', suggested max_accel <= 1900 mm/sec^2
Recommended shaper is ei @ 38.6 Hz
The only 2 lines that will be needed are
# For x axis
Recommended shaper is 3hump_ei @ 82.2 Hz
# For y axis
Recommended shaper is ei @ 38.6 Hz
Now you can append your parameters in printer config file
[input_shaper]
shaper_freq_x: 82.2
shaper_type_x: 3hump_ei
shaper_freq_y: 38.6
shaper_type_y: ei
You can also adjust your max_accel with the minimum values suggested by the shaper choices
¶ Z axis Calibration
-
Home axis with '''G28'''
-
Change '''position_min: 0''' to '''position_min: -5''' in '''printer.cfg''' for '''stepper_z'''
-
Go to middle plate with macro '''probe middle plate'''
-
In console type '''PROBE_CALIBRATE'''
-
Get a paper and move your extruder close to the paper with instructions: '''TESTZ Z=-.1''' '''TESTZ Z=+.1''' '''TESTZ Z=+1''' '''TESTZ Z=-1''' or using the buttons
-
When good, type '''ACCEPT'''
-
Don't forget to save with '''SAVE_CONFIG'''
-
Change '''position_min: -5''' to '''position_min: 0''' in '''printer.cfg''' for '''stepper_z'''
-
Restart Klipper